
Fast Protocol and Machine Workflow
Authors: Gabriel Ruiz – 4/11/23
Approval: Nicholas Namias – 4/11/23
General Considerations:
- Keep the machine connected to the power source at all times. Fold the screen for transport.
- Do not place patient labels on the machine, the adhesive will damage the glass.
- Always place a protective sleeve on the probe BEFORE Starting Exam
- When in doubt, discuss the indication to perform the exam with the attending or the senior surgery resident / trauma Fellow
- Do not start the FAST until the patient’s primary survey has been done and any issues with airway, breathing, hemodynamic instability or impending brain herniation have been addressed
- After finalizing the exam, remove and discard the protective sleeve from the probe. Clean the probe and the machine after every exam with Red-Top wipes only. Do not start an exam with a visibly soiled probe, a reused sleeve, or soiled machine.
- The machines are cleaned several times during the day by the ancillary staff.
Do not start an exam without a protective sleeve on the probe
General Considerations:
- Keep the machine connected to the power source at all times. Fold the screen for transport.
- Do not place patient labels on the machine, the adhesive will damage the glass.
- Always place a protective sleeve on the probe BEFORE Starting Exam
- When in doubt, discuss the indication to perform the exam with the attending or the senior surgery resident / trauma Fellow
- Do not start the FAST until the patient’s primary survey has been done and any issues with airway, breathing, hemodynamic instability or impending brain herniation have been addressed
- After finalizing the exam, remove and discard the protective sleeve from the probe. Clean the probe and the machine after every exam with Red-Top wipes only. Do not start an exam with a visibly soiled probe, a reused sleeve, or soiled machine.
- The machines are cleaned several times during the day by the ancillary staff.
Do not start an exam without a protective sleeve on the probe
Starting an Exam
- Turn the machine on by pressing the ON button located on the left corner of the machine. The booting time is approximately 20 seconds
- The machine will immediately go into the Patient information screen
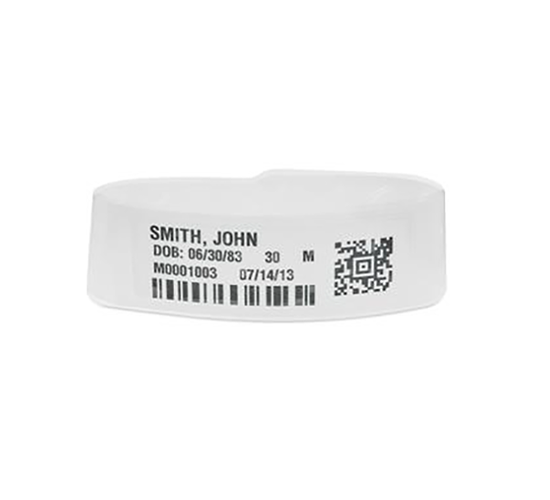
- Scan the large QR code on the patient’s identification bracelet and confirm that the patient’s demographics have transferred into the machine screen.
You are just about to enter a carousel of images of 2 slides.
You are just about to enter a carousel of images of 2 slides.
Scanning
- The machine will go into the scanning mode. The default Exam type is “Abdomen” and the probe is the “P19” at 5-1MHz.
- Freeze the still images for the RUQ, LUQ, Pelvis and Lung views. Obtain video clips of the pericardium and of every positive/indeterminate view.
- Use “M MODE” for the lung views
- See the Ryder FAST protocol document (Appendix) for the quality requirements on every image. The images can be reviewed for good technique, anatomical requirements and interpretation by any member of the faculty.
- Once all the images are obtained you can either review the exam by pressing the “REVIEW” tab on the top or end the exam by pressing the “END EXAM” button
- Once the exam is ended, the machine will automatically upload the images into the PACS system. The images are paired to the patient record by using the identification information.
- Clean the probe and the machine to remove the ultrasound gel and any body fluid thoroughly with the Red-Top wipes only. You will find it in the bucket on the back of the machine. Alert Ancillary services if there are no wipes or ultrasound gel available.
You are just about to enter a carousel of images of 2 slides.
You are just about to enter a carousel of images of 3 slides.
You are just about to enter a carousel of images of 3 slides.
Documenting the Fast Exam
- Documentation of the FAST exam in the CARE system is mandatory
- Every FAST exam should be properly documented for technique and interpretation, and the note should be sent to the attending supervising the exam
- Once, finished, the CARE note will be automatically transferred into Cerner
- Reporting the findings and interpretation of the FAST exam on the Cerner note does not preclude properly documenting the exam on the CARE system.
- If the FAST is repeated due to patient clinical deterioration, it has to be documented again
You are just about to enter a carousel of images of 3 slides.
Support Groups
Starting an Exam
- Turn the machine on by pressing the ON button located on the left corner of the machine. The booting time is approximately 20 seconds
- The machine will immediately go into the Patient information screen
- Scan the large QR code on the patient’s identification bracelet and confirm that the patient’s demographics have transferred into the machine screen.
You are just about to enter a carousel of images of 2 slides.
Scanning
- The machine will go into the scanning mode. The default Exam type is “Abdomen” and the probe is the “P19” at 5-1MHz.
- Freeze the still images for the RUQ, LUQ, Pelvis and Lung views. Obtain video clips of the pericardium and of every positive/indeterminate view.
- Use “M MODE” for the lung views
- See the Ryder FAST protocol document (Appendix) for the quality requirements on every image. The images can be reviewed for good technique, anatomical requirements and interpretation by any member of the faculty.
- Once all the images are obtained you can either review the exam by pressing the “REVIEW” tab on the top or end the exam by pressing the “END EXAM” button
- Once the exam is ended, the machine will automatically upload the images into the PACS system. The images are paired to the patient record by using the identification information.
- Clean the probe and the machine to remove the ultrasound gel and any body fluid thoroughly with the Red-Top wipes only. You will find it in the bucket on the back of the machine. Alert Ancillary services if there are no wipes or ultrasound gel available.
You are just about to enter a carousel of images of 2 slides.
You are just about to enter a carousel of images of 3 slides.
Documenting the Fast Exam
- Documentation of the FAST exam in the CARE system is mandatory
- Every FAST exam should be properly documented for technique and interpretation, and the note should be sent to the attending supervising the exam
- Once, finished, the CARE note will be automatically transferred into Cerner
- Reporting the findings and interpretation of the FAST exam on the Cerner note does not preclude properly documenting the exam on the CARE system.
- If the FAST is repeated due to patient clinical deterioration, it has to be documented again
You are just about to enter a carousel of images of 3 slides.